Posts

Showing posts with the label GIS5103- GIS Programming

Module11- Sharing Tools

Image
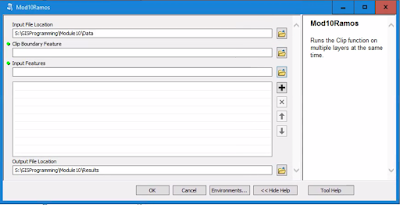
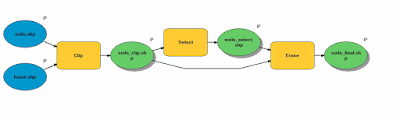
This module served very much as a review in Script Tools. The assignment required that we edit an existing script to work with data provided, edit parameter details for the tool to become more user friendly, then finalize it by embedding the script into the tool and creating a password for it.  This is the final outcome of tool. It was supposed to create randomized points with buffers within the feature boundary.  Below is a flowchart displaying basic steps taken to create and share this Script Tool. ...and that's a wrap! This was the last module for GIS Programming course. I still have the final project to complete for next week. While it's not the end yet, there is a sense of accomplishment in having made it this far in a course I thought I would perform terribly in. All modules focused on Python fundamentals were very challenging for me but also the most rewarding once I figured things out. It was really helpful being familiar with how certain tools wo...

Module 10- Creating Custom Tools

Image
This week we reviewed some Script Tool fundamentals. The lab required that we modify a stand alone script to perform a multi clipping task in ArcMap. First, I tested the script in PythonWin to make sure it worked. Then created a new Toolbox in ArcMap, added a new Script Tool, and linked the stand alone script here in order to use it. Next was modifications to the Script Tool parameters and script to make it work in ArcMap. Below is an image of the opened Script Tool displaying both input and output locations, meaning that the new parameters were working as expected. After making some code adjustments to the script and editing variable values to point to the desired parameters for Output Boundary Feature and Input Features. The tool dialog box below displays a successful task completed listing all the shape files being clipped in the process. There are definitely more steps in the process of creating a new custom tool for ArcMap while the script may be simpler. Bel...

Peer Review Assignment #2

This peer review takes a look at A new GIS-based model for automated extraction of Sand Dune encroachment case study: Dakhla Oases, western desert of Egypt found in the UWF Journal's resources database. Sand dunes are considered a threat for roads, water sources, agriculture, irrigation networks, and infrastructures in the Dakhla Oases in the western desert region of Egypt. The focus of this paper is to develop a new GIS based model for automated extraction of sand dune encroachment using remote sensing data to assess the rate of sand dune movement. The paper is a group effort amongst staff from the Department of Remote Sensing and Landscape Information Systems (FeLis) at Freiburg University, Germany, and the Land Use Department at the National Authority for Remote Sensing and Space Sciences (NARSS) in Cairo, Egypt. This particular case study was published in Volume 15, Issue 1 of The Egyptian Journal of Remote Sensing and Space Science in June 2012. The data provided for this c...

Module 9- Working with Rasters

Image
Last week we focused on vectors, this week we looked at working with rasters in Python. This lab assignment required to write a script that does the following tasks: creates a raster output file that identifies areas with specific parameters (slope, aspect, and land cover type). The flowchart to the right displays simplified steps taken in the script. Using two rasters, for landcover and elevation, the final raster highlights areas that suit the following criteria: Forest landcover consists of classifications 41, 42, and 43 Slope falls between 5-20° Aspect ranges between 150-270° Below is the script output: and the final raster image:

Module 8- Working with Geometries

Image
This week's exercises demanded hands on writing multiple scripts that worked with geometries in a shape file and text file in order to produce a poly line. I've never done this type of script, so it was really interesting going through the steps to find points, find lengths, and define an area using just a script and coordinates in a text file. For the lab, I wrote a script that creates a new text file in which it writes the Object IDs for the vertices in a shape file and the coordinates. To be honest, I had some troubles working backwards in the retrieval of coordinates part as well as writing all the vertices into the text file. Below is part of the script output.

Module 7- Exploring & Manipulating Spatial Data

Image
This week we will learn how to read, update, and manipulate data using lists, dictionaries, cursors, and loops. The lab itself was well designed in breaking down all steps necessary which consisted of the following tasks.: Create a new Geodatabase. Set a current workspace which includes Data output folder. Created variable fclist to get a list of all feature classes in the data set. Created a for loop to copy over all features from the workspace to the new Geodatabase. Created a Search Cursor for cities layer filtering city names and populations that met the criteria. Created an empty dictionary and populated it with cities and their populations using a for loop. Added "Process complete!" messages to each step as validation that a step had been completed. Below is the output for all steps completed. The most difficult step was creating a  for  loop for the last requirement in order to populate the dictionary. I was going down the wrong path for a while...

Module 6- Geoprocessing with Python

Image
In this module we learned how to perform geoprocessing tasks using Python and the syntax for using tools and toolboxes from ArcMap. The lab required to perform three geoprocessing tasks: Add XY coordinates to a shape file. Create a buffer of 1000 meters for the shape file. Dissolve the buffer into a separate feature. Each task also had to print the messages form every tool using the GetMessages() function.  Below is a simple model of what was done in the script. This interactive window shows the script's final output messages.

Module 5- Geoprocessing in ArcGIS

Image
This week we practiced several types of geoprocessing techniques, including batch processing, making new tools with ModelBuilder, and converting those tools into Scripts and Script tools. For the lab part, we had to create a model and a script tool to perform two geoprocessing tasks: first to run a query of soils with a specific attribute, and then to erase those soils and produce a final soil shape file. The final model clips, queries, then erases and produces three new shape files (soil_clip, soil_select, and soil_final) as seen below. The final outcome on the map looks like this: The Soil shape file has been clipped to display Soils that fall within the Basin shape file. Soils with the attribute 'Not prime farmland' have been selected and removed from the final Soil shape file. 

Peer-Review Assignment #1

This first peer-review looks at  Geoprocessing tool to model beach erosion due to storms: application toFaro beach (Portugal) . The paper is on a geoprocessing tool used to model beach erosion, specifically applied to Faro beach in South Portugal. This tool would assess beach erosion due to storms using two computational modules in order to determine whether the geoprocessing tool would be useful in helping predict storm impact along Faro beach. Its final conclusion was that the tool does work after several testing procedures to assure that the tool could be relied upon. It appears to be original work published on the Journal of Coastal Research, Special Issue 64, 2011 by faculty from Center for Marine and Environmental Research (CIMA) at Algarve University and University of Lisbon in Portugal. The science and testing procedures described were clear and concise. Sufficient data information is provided to follow along their methods of testing the geoprocessing tool. The pape...

Module 4- Debugging and Error Handling

Image
In this module we explored numerous methods for debugging which included examining error messages, the addition of print statements, and practiced more selective commenting out of code. We also reviewed approaches to basic error-handling, coding errors in Python and ArcGIS geoprocessing. The lab required to debug 3 different scripts: The first required to fix the errors in the script. In the end, it would print the field names for a shape file. The second script also had errors to fix and would produce a list of layers in an AcMap file. The final script also had errors and consisted of 2 parts. Instead of fixing them I needed to include an exception for it to print the error in Part A and then continue to run the script in Part B.

Module 3- Python Fundamentals Part 2

Image
Continuing with fundamentals, we delved into learning to use conditional statements to perform different actions in differing situations, for and while loops to repeat processes, and also get our hands on practicing how to identify and fix errors in Python. For this lab, I completed an unfinished Python script for a dice game, corrected errors in it, then added two new blocks of code requiring to print statements for certain conditions and remove a number from a randomly generated number list. Below is the final outcome.

Module 2- Python Fundamentals Part 1

Image
Continuing Python fundamentals this week, we get our hands on with Functions! We learned how to assign string variables, had to use methods and functions to manipulate strings and lists, and finally perform a basic math function. It started by creating a string using my full name-- stringName = "Julieta Ramos" Then creating a list by using the split method-- listName = stringName.split(" ") After printing my last name, a new variable called lastNameLen was created to find the length of my last name. This was done by counting the letters in my last name using the function len. Below is the work involved to achieve this lab's objective. The examples and basic exercises in lecture really helped getting some of those simple functions into memory. While thinking of how to write these functions, I was also mindful of how to minimize the amount of entries to reach the desired result.

Module 1- Introducing Python

Image
For our first Module of the semester, we get acquainted with Python by focusing on the following learning outcomes: Use the IDLE (Python GUI) interactive window  Use PythonWin interactive window  Save and run a script in PythonWin  Use the ArcGIS Interactive Python Window Run a script using PythonWin  The first exercise had us get some hands on practice by installing PythonWin and then creating a simple script, called hello.py, seen below. So how is this integrated in ArcMap? It happens that it's another tool within ArcMap starting in v. 10. The tool consists of an interpreter panel on the left hand side and a Help and syntax panel, which helps one understand what a command will do or how to utilize it. The assignment itself allowed us to see  one of the many uses of a script. We were given a completed script designed to create a specific number of folders for every module in this course and is required to run in a specific computer drive. W...